POSTS
記事
博客折腾日记之OpenGraph图像的自动生成
日志
书接上回
对于 OpenGraph(不知道是什么的回去看上集)的支持,不管是毛来的还是我写的主题,无论本身支不支持我都会重新手写出来。但是仅仅有元数据的支持是不够用的,依旧需要创造内容,总不能每一次写博客文章的时候就重新去 ps 里面画一个文章封面吧(确实之前做过,最后还是偷懒没坚持下去),程序员与一般人区别就在于懒得干的事情会写个程序让电脑帮自己完成,那么活不就来了?请看:
之前在 Twitter 上发布自己博客文章链接的时候是这个样子:

Twitter 小卡片预览
好吧,不是很抓人眼球啊。
准备
参考了下其他大佬的做法1,目前采用的方法是(在 Astro 中是这样的流程,其他类似的 ssg 框架亦可能是这样的,仅供参考):Astro 在生成博客文章页面时,检查用户是否为它设置了 OpenGraph 图像。若没有则调用 Satori(画 svg)然后使用 resvg-js(转图像)生成 png,保存在博客文章页面目录下,之后让博客页面带上指向生成的 OpenGraph 图像文件的元数据。这样就大功告成了。
首先安装项目依赖:
pnpm add satori @resvg/resvg-js然后需要更改博客文章模板文件的结构,大部分模板的博客文章页面应该是这样:
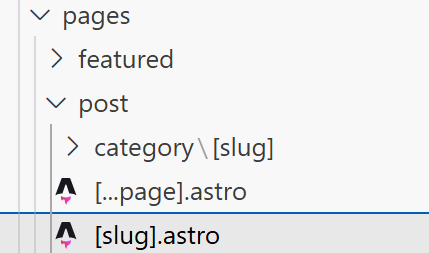
也就是 /post/[slug] 这样的路由,虽然 astro 为了避免生成后文件在访问时出现 .html 的后缀会生成文件夹来存放 index.html,但现在我们需要文件夹中出现其他文件,所以得修改这个默认行为。
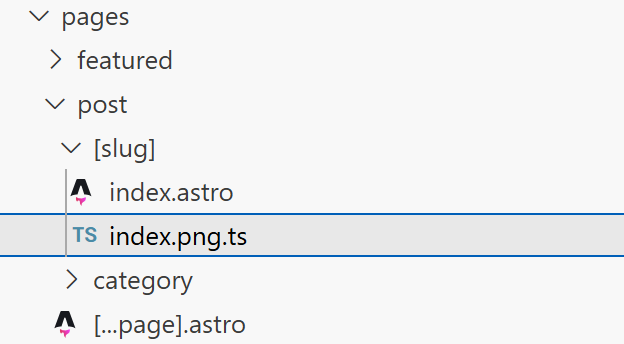
如果需要每个页面都生成,这种方法并不适合我们,因为我们生成的图像文件是和博客文章页面在一个文件夹中的,所以需要更改文件结构,在 @/src/pages/post 目录创建名为 [slug] 的文件夹,将原来的 [slug].astro 文件文件更名为 index.astro 放到刚刚创建的文件夹中,然后再在同样的文件夹内创建 index.png.ts 文件,最后文件夹结构应该是这个样子:
然后在 @/src/utils 文件夹创建 @/src/utils/generateOgImages.ts 还有 @/src/utils/og-template.tsx 。
在这里需要注意的是,因为 satori 是 vercel 的项目,它支持的模板语言只有 html/json/jsx,如果你的项目里没有 react,请为它额外安装,否则在使用 TypeScript 时会报类型错误,也有可能无法正常构建。懒人直接运行 pnpm astro add react 就好了,它会自动帮你安装 react 并配置好 tsconfig。
index.png.ts Astro 运行在 ssg 模式时,在生成博客文章页面时会调用这个文件,也需要使用 getStaticPaths() 告诉 Astro 应该生成什么,写法和 .astro 文件的 frontmatter 一样,只不过这个文件控制 Astro 在最终生成了 .png 文件。
新版本的 Satori 是需要在生成时加载字体的,如果你在 SatoriOptions 中未指定字体会在构建时抛出错误,所以在这里我又参考了另外的做法2,从谷歌加载字体文件。
(踩坑:尝试过直接使用 fs 加载本地字体文件不过失败了,报错发现 satori 运行时的目录在 dist 中,无法从 src 读取字体文件,暂时使用联网加载谷歌字体这一方法来辅助完成这一步骤。但这导致网络环境较差时本地构建时速度极慢,因为每生成一张都要从 api 重新加载,不过扔 vercel 上好像速度还能接受就没管了)
import satori, { type SatoriOptions } from "satori";
import { Resvg } from "@resvg/resvg-js";
import postOgImage from "./og-templates.tsx";
import type { CollectionEntry } from "astro:content";

// reference: https://hanzochang.com/articles/20
async function getFont(fontFamily: string, weight = 400): Promise<ArrayBuffer> {
  const API = `https://fonts.googleapis.com/css2?family=${fontFamily.replace(
    / /g,
    "+"
  )}:wght@${weight}&display=swap`;
  const css = await (await fetch(API)).text();
  const resource = css.match(
    /src: url\((.+)\) format\('(opentype|truetype)'\)/
  );
  if (!resource) throw new Error(`Failed to find font URL for: ${fontFamily}`);
  return await (await fetch(resource[1])).arrayBuffer();
}

const options: SatoriOptions = {
  width: 1080,
  height: 600,
  fonts: [
    {
      name: "Oranienbaum",
      data: await getFont("Oranienbaum"),
      weight: 400,
      style: "normal",
    },
    {
      name: "Noto Serif SC",
      data: await getFont("Noto Serif SC"),
      weight: 400,
      style: "normal",
    },
    {
      name: "Noto Serif JP",
      data: await getFont("Noto Serif JP"),
      weight: 400,
      style: "normal",
    },
  ],
};

export async function generateOgImageForPost(post: CollectionEntry<"blog">) {
  const svg = await satori(postOgImage(post), options);
  return svgBufferToPngBuffer(svg);
}

function svgBufferToPngBuffer(svg: string) {
  const resvg = new Resvg(svg);
  const pngData = resvg.render();
  return pngData.asPng();
}
generateOgImages.ts 这个文件包装了用于生成 OpenGraph 文件的方法,用于直接在模板文件中调用。
import satori, { type SatoriOptions } from "satori";
import { Resvg } from "@resvg/resvg-js";
import postOgImage from "./og-templates/post";
import type { CollectionEntry } from "astro:content";

const options: SatoriOptions = {
  width: 1080,
  height: 600,
};

export async function generateOgImageForPost(post: CollectionEntry<"blog">) {
  const svg = await satori(postOgImage(post), options);
  return svgBufferToPngBuffer(svg);
}

function svgBufferToPngBuffer(svg: string) {
  const resvg = new Resvg(svg);
  const pngData = resvg.render();
  return pngData.asPng();
}
og-template.tsx 是模板文件,提供给 Satori 生成 svg 用于进一步处理。关于 OpenGraph 图像设计这边直接去官方的 playground 看看就好了,支持可视化,做好模板之后代码直接复制粘贴即可。
import type { CollectionEntry } from "astro:content";
import { SITE_TITLE } from "../../consts";

export default (post: CollectionEntry<"blog">) => (
  <div
    style={{
      display: "flex",
      flexDirection: "column",
      height: "100%",
      width: "100%",
      alignItems: "flex-start",
      justifyContent: "center",
      letterSpacing: "-.02em",
      fontWeight: 400,
      background: "#FBE5E3",
    }}
  >
    <div
      style={{
        left: 42,
        top: 42,
        position: "absolute",
        display: "flex",
        alignItems: "center",
      }}
    >
      <span
        style={{
          width: 24,
          height: 24,
          background: "black",
        }}
      />
      <span
        style={{
          marginLeft: 8,
          fontSize: 20,
          fontWeight: 700,
        }}
      >
        {SITE_TITLE}
      </span>
    </div>
    <div
      style={{
        display: "flex",
        flexWrap: "wrap",
        justifyContent: "flex-start",
        padding: "20px 50px",
        fontSize: 40,
        width: "100%",
        textAlign: "left",
        backgroundColor: "#F6F6F1",
        color: "black",
        lineHeight: 1.4,
        borderTop: "1px",
        borderBottom: "1px",
      }}
    >
      {post.data.title}
    </div>
    <div
      style={{
        padding: "20px 50px",
        width: "100%",
        fontSize: 25,
        color: "black",
        wordBreak: "break-all",
      }}
    >
      {post.data.description}
    </div>
  </div>
);
大功告成了……吗?
最后还有一步,是需要你自己写到你的博客模板文件中的,让 Astro 自动将没有自定义 OpenGraph 图片的博客文章页面的 meta 信息自动指向生成的图像文件。因为每个博客主题的结构都不一样,在这里我就不一一细说了,这里给个方法仅供参考(指向图片的绝对位置):
修改内容集合的类型
content.config.ts
import { defineCollection, z } from "astro:content";

const blog = defineCollection({
  // Load Markdown and MDX files in the `src/content/blog/` directory.
  loader: glob({ base: "./src/content/blog", pattern: "**/*.{md,mdx}" }),
  // Type-check frontmatter using a schema
  schema: z.object({
    title: z.string(),
    description: z.string(),
    // Transform string to Date object
    pubDate: z.union([
      z.coerce.date(),
      z.string().transform((str) => new Date(str)),
    ]),
    updatedDate: z
      .union([z.coerce.date(), z.string().transform((str) => new Date(str))])
      .optional(),
    heroImage: z.string().optional(),
    ogImage: z.string().optional(), // 添加这一行(如果没有的话)
    category: z.string(),
    featured: z.boolean().optional(),
  }),
});

export const collections = { blog };
传递 slug
@/src/pages/post/[slug]/index.astro
---
import { type CollectionEntry, getCollection } from "astro:content";
import BlogPost from "../../../layouts/BlogPost.astro";
import { render } from "astro:content";

export async function getStaticPaths() {
    const posts = await getCollection("blog");
    return posts.map((post) => ({
        params: { slug: post.id },
        props: post,
    }));
}
type Props = CollectionEntry<"blog">;

const post = Astro.props;
const { Content } = await render(post);
---

<BlogPost
        {...post.data}
        pageTitle="POSTS"
        pageTitleJa="記事"
        slug={post.id}
        ><!--向博客文章模板文件传递slug用于创建绝对链接-->
    <Content />
</BlogPost>
修改博客文章模板
@/src/layouts/BlogPost.astro
---
import type { CollectionEntry } from "astro:content";
import BaseHead from "../components/BaseHead.astro";
type PostProps = CollectionEntry<"blog">["data"];
interface Props extends PostProps {
pageTitle?: string;
pageTitleJa?: string;
slug: string; // 添加类型定义
}
const {
title,
description,
pubDate,
ogImage,
category,
pageTitle,
pageTitleJa,
slug, // 添加参数导出
} = Astro.props;
const image = ogImage || `/post/${slug}/index.png` // 生成绝对路径并交由下一个函数处理
const resolvedImageURL = new URL(image, Astro.site).toString() // 处理生成带网站域名的url
---
<html>
<head>
...
<!-- Open Graph / Facebook -->
<meta property="og:type" content="website" />
<meta property="og:url" content={Astro.url} />
<meta property="og:title" content={title} />
<meta property="og:description" content={description} />
<meta property="og:image" content={resolvedImageURL} />
<!-- Twitter -->
<meta property="twitter:card" content="summary_large_image" />
<meta property="twitter:url" content={Astro.url} />
<meta property="twitter:title" content={title} />
<meta property="twitter:description" content={description} />
<meta property="twitter:image" content={resolvedImageURL} />
...
</head>
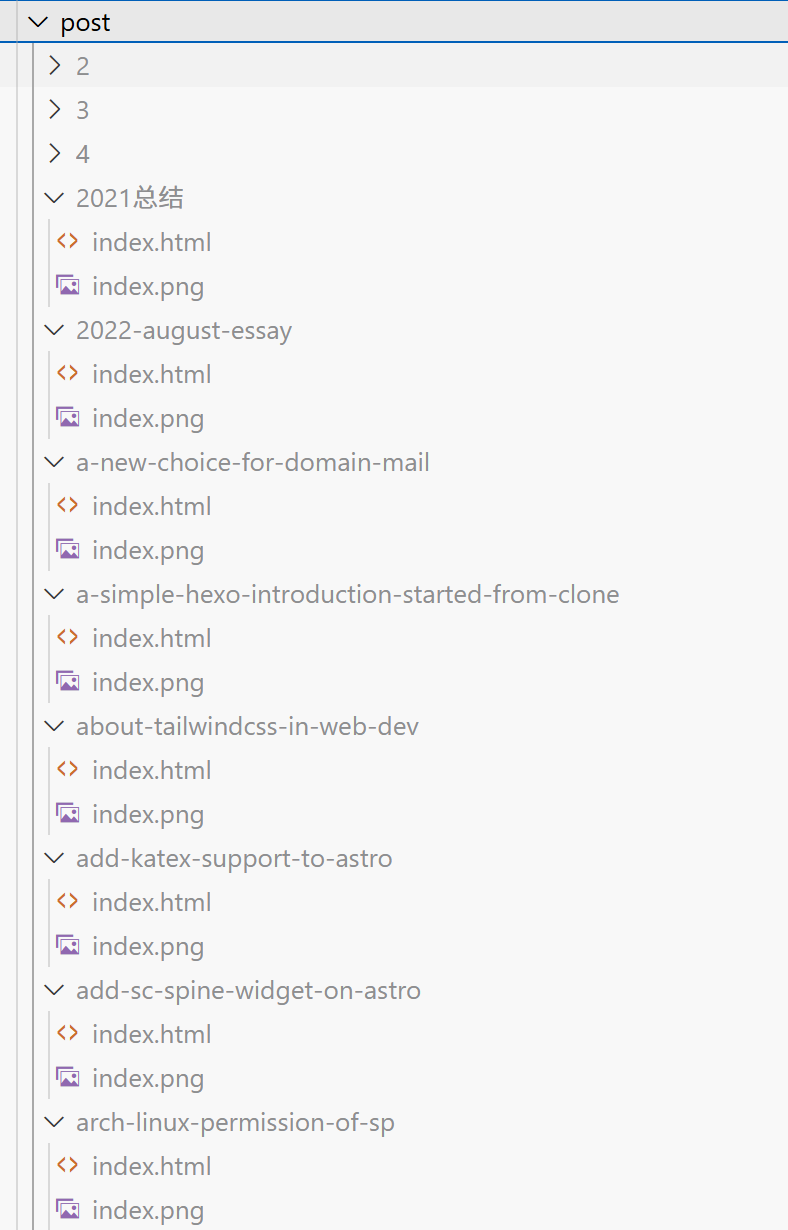
...到了这一步基本完成了,运行 build 看一下吧。
结果验收
可以看到 Astro 很听话地在每一个没有指定 OpenGraph 图像的博客页面文件夹下都创建了一个 index.png

效果测试
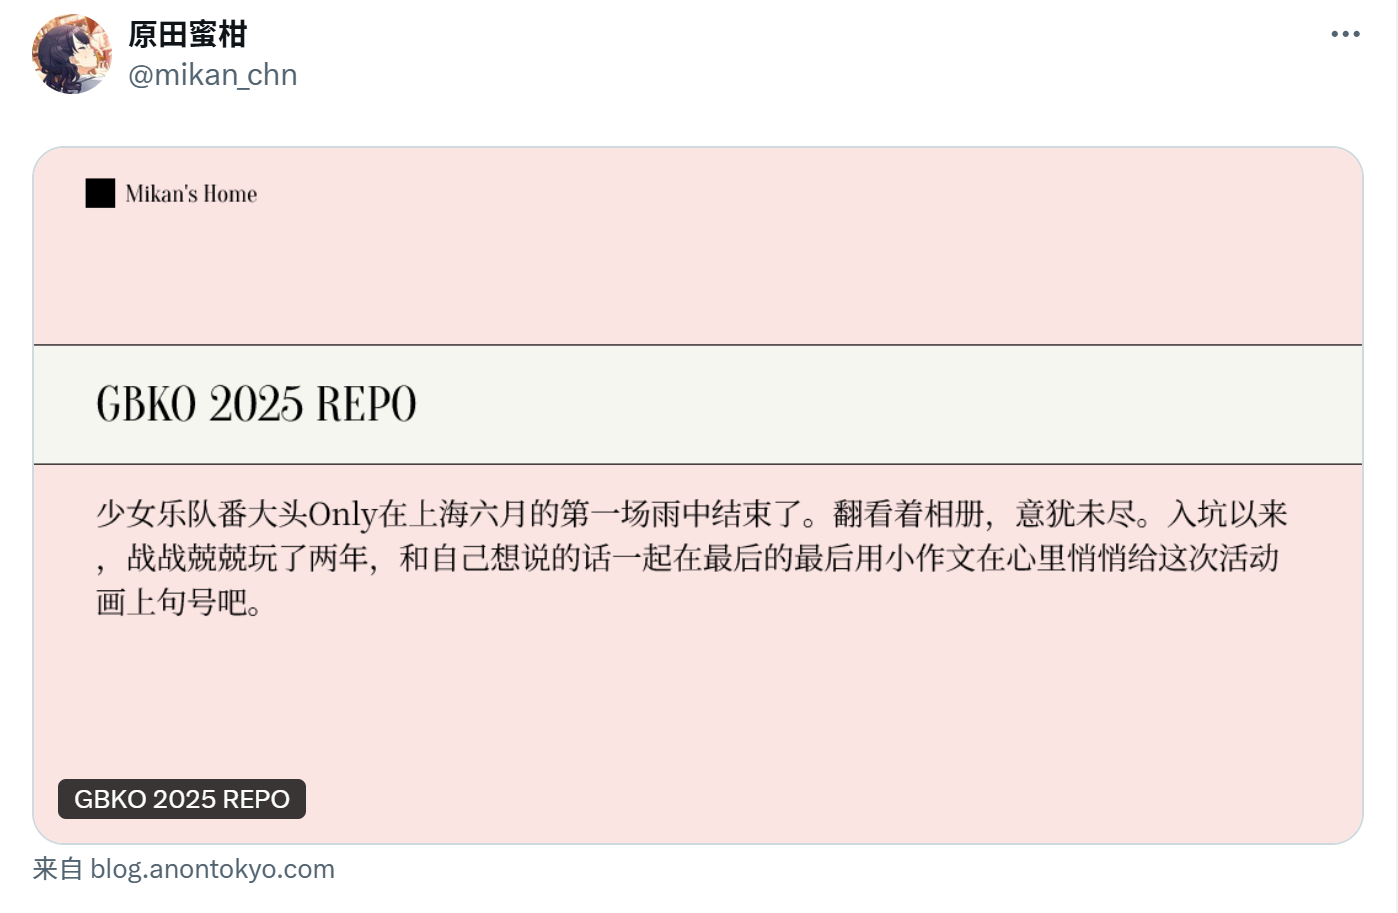
Twitter 大卡片预览
怎么样,是不是老带派了?
Footnotes
SHARE
COMMENT